Steps
Think of workflow steps as individual units of work. Together, performed in the right sequence, the workflow steps complete a body of work. This is no different that steps done manually, but without the possibility of human error such as leaving out a step, or performing a step incorrectly. When you create a new workflow you define the type, the model, the condition (when required) and give it a name. Then you define the individual steps that will be performed when the workflow is initiated. maiLink provide a drag-and-drop user interface for defining those steps, called the Step Builder.
Step Builder
When you create a new workflow you are first presented with an empty Step Builder screen. It shows only the Trigger and End boxes in the workflow diagram, and the initial focus is on defining the Trigger.
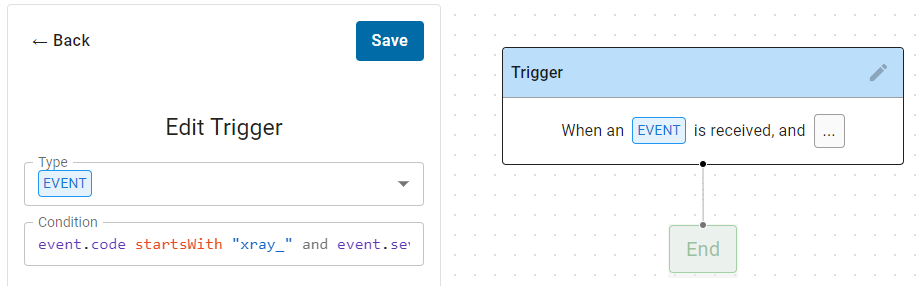
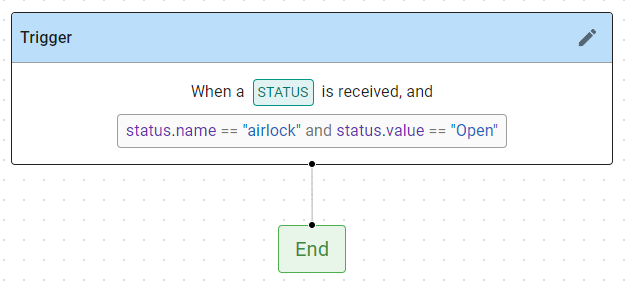
By default the trigger is set to an Event type, but you can select Manual (User_Dispatch), Metric or Status with the pull-down. For Event, Metric or Status type triggers, you then define the Condition. Default strings are inserted to give you some guidance and help you remember what to do.
- Type the condition
- As you type, syntactic suggestions are made.
- Select from the suggestions with the arrow keys.
- Add a suggestion to your condition with the tab key.
- Click Save to store your condition
- The Trigger box will be updated.
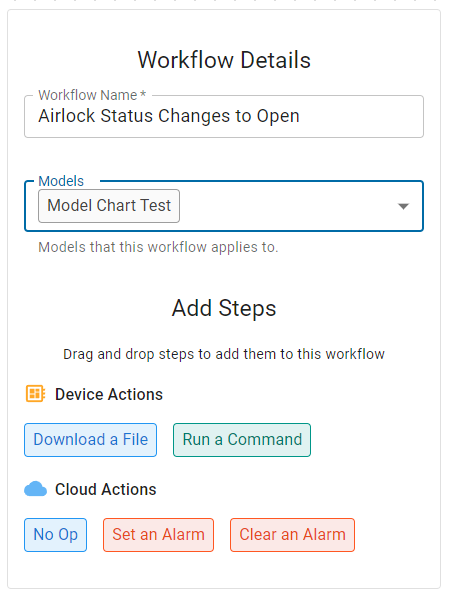
Then specify the workflow details at the left:
- Type in a name for the workflow.
- Select the Model that will use this workflow.
Note: Today you can select multiple models – this is a design issue that will be removed in a future release.
Note: Please select only a single model for each workflow. Why? Because there is only one copy of each workflow in the cloud. If you assign one workflow to multiple models, and in the future want to modify the workflow for just one of the models, you will have no way to easily do that.
Note: In a future version we will provide a way to create a copy of a workflow and reassign that copy to a different model. Then they can easily diverge.
Individual Steps
Within the workflow you can define the series of steps that will be executed to accomplish the goal. Order is important as the steps will be run in sequence, and no step will begin until the prior step and completed. Any step that fails will terminate the workflow.
| Step | Description | Parameters | Processing Location | Release |
|---|---|---|---|---|
| Run Command | Runs a single command line on the target device. | Command | Device | Mar 2023 |
| Set Device Tag | Sets the value of a Device Tag. | Device Tag Name | Cloud | ~Mar 2023 |
| Download File | Runs a single command line on the target device. | Command | Device | ~Apr 2023 |
| Set Alarm | Sets an alarm. | Alarm Name | Cloud | ~Apr 2023 |
| Clear Alarm | Clears an alarm. | Alarm Name | Cloud | ~Apr 2023 |
Defining the Workflow Steps.
To use the Step Builder:
- Drag (left mouse click and hold) a color step block from the Add Steps are at the left.
- As you drag one, you will see circled green plus signs appear indicating where you need to drag the block.
- Release the mouse click when the tip of the cursor is over the desired circle.

- If the step requires inputs, they will open by default at the left.
- Enter the required data for the step.
- Click Save to store the parameters for that step.
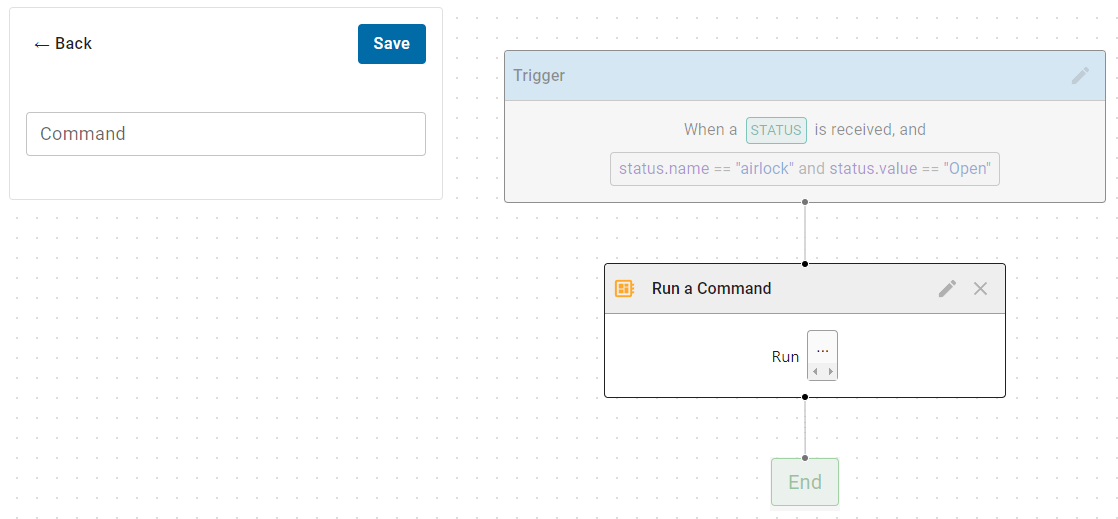
- Continue dragging and dropping step blocks onto the workflow diagram until all the steps are in place.
- When all the steps are in place, click Save (bottom left) to save the workflow.