This is the multi-page printable view of this section. Click here to print.
Workflows
- 1: Overview
- 2: Triggers
- 3: Condition Syntax
- 4: Steps
1 - Overview
Workflows are designed to automate a series of one or more steps that are to be taken given a specific trigger. That trigger may be manually invoked (by a person) or automatically invoked (by telemetry).
Each workflow has a definition with five main components, listed in the order they are defined here:
| Component | Description |
|---|---|
| Trigger | The type of trigger. One of: Manual, Event, Metric, Status. Once this is defined, you cannot change it. |
| Model | The model to which the workflow applies. |
| Name | The name of the workflow. |
| Condition | Only applies to Event, Metric and Status triggers. The condition is a logical expression that will be evaluated each time a telemetry message is received to determine if the workflows should be triggered. |
| Steps | Steps are individual work items that must be performed in sequence to accomplish the goal(s) of the workflow. |
Workflow Execution
Workflows, whether initiated manually or automatically, are executed in the cloud. The cloud processes each initiated workflow one step at a time. It starts a step, and waits for a result from that step before proceeding. If the step fails, the workflow is terminated. If the step succeeds then the cloud initiates processing of the next step.
Steps are processed either in the cloud or on the device, depending on what the step is trying to accomplish. In general, file transfers are managed by the maiLink agent on the device, as are device-side command, script and executable processing steps. The cloud generally handles distribution of tasks to devices as well as all direct communication steps between maiLink and 3rd party APIs.
Execution Sequence
Every time a workflow gets triggered its steps are added to a queue (including the Device ID). The cloud then begins working its way through the workflow, one step at a time. Each step executes to completion before the could will being processing of the following step, so each workflow is processed synchronously.
In a situation where multiple workflows are initiated for a single device, the cloud will process each workflow synchronously. However it is possible that the steps of different workflows will be interleaved. If one workflow is held up because a step has not finished, another workflow might complete several steps in the meantime.
Note: For this reason, it is important that workflows not have dependencies on the completion (or partial completion) of other workflows.
2 - Triggers
Triggers
Manual triggers
Manual triggers are used to create a shortcut for a set of steps that are done often. Instead of performing a number of individual tasks, in sequence, again and again, the user simple initiates a workflow each time. Consider this example:
Before:
    user steps:
        remote log into system
            Username:   user
            Password:   password
        scp /etc/log/file1.log cloud:/device[123]/files
        scp /etc/log/file2.log cloud:/device[123]/files
        scp /etc/log/file3.log cloud:/device[123]/files
        scp /etc/log/file4.log cloud:/device[123]/files
        scp /etc/log/file5.log cloud:/device[123]/files
        Log out
After:
    workflow definition:
        trigger:    manual
        name:       pull-files
        model:      zafaroni 2500
        steps:
            Run Command [zip /tmp/logfiles.zip /etc/log/file*.log]
            Run Command [curl -X POST -X POST "http://localhost:5465/mailink/v1/telemetry"
                -H "accept: */*" -H "Content-Type: application/json"
                -d '{"path":"/tmp/logfiles.zip","destinationPath":"logfiles.zip"}']

    user steps:
        initiate pull-files
Manual initiation of a workflow is done through the maiLink portal with no typing. This is obviously more efficient, but also means fewer errors are made.
Automated triggers
Automated triggers occur when the maiLink cloud detects that certain conditions have been met. Currently, automated triggers are all based on telemetry. We expect that to change in the coming months.
Telemetry triggers
Each time a telemetry message is received in the cloud, it is evaluated against all the workflows that are defined for that model (the model of the device that sent the telemtry message) with the same type as the message. As an example, if there are four workflows of type Event defined for model “Sanguis 2500”, and an Event telemetry message is received by the cloud froma Sanguis 2500 system, then the conditions in those four workflows will each be evaluated. It is possible that four workflows will be triggered.
Suppose that four workflows are defined as shown below. If a telemetry metric message is received from a Baristamatic 2500 system with “motor_rpm” value of 55, then you can see that three workflows are triggered (Workflow 4 has the right model, but does not meet the condition; Workflow 5 has the wrong model, so the condition is ignored).
| Workflow | Model | Condition | Triggered? |
|---|---|---|---|
| 1 | Baristamatic 2500 | metric.name == “motor_rpm” and metric.value < 100 | Yes |
| 2 | Baristamatic 2500 | metric.name == “motor_rpm” and metric.value < 80 | Yes |
| 3 | Baristamatic 2500 | metric.name == “motor_rpm” and metric.value < 60 | Yes |
| 4 | Baristamatic 2500 | metric.name == “motor_rpm” and metric.value < 40 | No |
| 5 | Baristamatic E130 | metric.name == “motor_rpm” and metric.value < 60 | No |
For details on the syntax for conditions, please see Condition Syntax.
3 - Condition Syntax
Telemetry trigger conditions are written like logical statements that are to be evaluated, but without the common “if/then” syntax. The conditions can be complex, including and/or logic, and nested parenthesis.
There is a lot of information below because you can do some quite sophisticated things in triggers. To help you find your way, here’s a handy index (with links):
| Class | Subclass | A Few Examples |
|---|---|---|
| Operands | Literal | Booleans, integers, floats |
| Telemetry | event.code, metric.value, status.name | |
| Devices | device.id, device.tags["tag_name"] | |
| Operators | Arithmetic | + - * / |
| Comparison | == != < > <= >= | |
| Logical | and, or, not | |
| String | contains, startswith, endswith |
To help guide you, there are some condition examples here.
The syntax can be quite complicated and, in fact, there are very additional built-in commands not described in this page. maiLink leverages a 3rd party libary for expression resolution in condition syntax evaluation. The details shown above represent the core features of the condition syntax. There are, however, further ways to construct conditions. maiData has neither used nor tested the additional methods that you can find described at antonmedv’s GitHub page at Expr Library Documentation.
Operands
Conditions are logical statements comprised of operands and operators. The operands allow you to test telemetry messages that are received. They also allow testing of other information about the device.
Literal Operands
| Type | Description | Example |
|---|---|---|
| Boolean | One of: true, false | false |
| Integer | An integer value. | 55.3 |
| Float | A floating point value. | 55.3 |
| String | ASCII characters enclosed in single or double quotes (' ' or " “). | “motor_rpm” |
| Array | A list of literal operand values enclosed in square brackets. | [1, 2, 3] |
| Range | An inclusive range of integers | 4..45 |
Operands From Telemetry Messages
| Operand | Type | Description |
|---|---|---|
| event.code | string | The code of the event. |
| event.text | string | A text blurb that describes the the event. |
| event.severity | number | The severity level of the event. |
| metric.label | string | The identifier of the metric. |
| metric.value | number | The value of the metric. |
| status.name | string | The identifier of the status. |
| status.value | string | The value of the status. |
Operands From Device Information
| Operand | Type | Description |
|---|---|---|
| device.id | string | The id of the device. This may be useful with the “contains”, “startswith” or “endswith” string operators. |
| device.name | string | The name of the device. This may be useful with the “contains”, “startswith” or “endswith” string operators. |
| device.status["status_name"] | string | The most recently received status value of status telemetry “status_name”. |
| device.tags["tag_name"] | string | The current value of device tag “tag_name”. |
| device.type | string | The device model (also known as device type) is defined for the workflow, so is probably not needed as an operand. |
Operators
Arithmetic Operators
maiLink workflows support common arithmetic operators in condition statements:
| Operator | Description | Example |
|---|---|---|
| + | Addition | metric.value * 3 |
| - | Subtraction | metric.value - 3 |
| * | Multiplication | metric.value * 3 |
| / | Division | metric.value / 3 |
| % | Modulus | metric.value % 3 |
| ^ or ** | Exponent | metric.value ^ 3 |
Comparison Operators
maiLink workflows support common comparison operators in condition statements:
| Operator | Description | Example |
|---|---|---|
| == | Tests if the values of two operands are equal or not; if yes, the condition becomes true. | event.code == “E1003” |
| != | Tests if the values of two operands are equal or not; if the values are not equal, then the condition becomes true. | status.label != “sw_version” |
| < | Tests if the value of left operand is less than the value of the right operand; if yes, the condition becomes true. Intended for metric messages because it is a numeric test. | metric.value < 55 |
| > | Tests if the value of left operand is greater than the value of right operand; if yes, the condition becomes true. Intended for metric messages because it is a numeric test. | metric.value > 55 |
| <= | Tests if the value of left operand is less than or equal to the value of right operand; if yes, the condition becomes true. Intended for metric messages because it is a numeric test. | metric.value <= 55 |
| >= | Tests if the value of the left operand is greater than or equal to the value of the right operand; if yes, the condition becomes true. Intended for metric messages because it is a numeric test. | metric.value >= 55 |
| in | Tests if the first operand is an integer within the range of values specified by second operand. | metric.value in 33..166 |
Logical Operators
maiLink workflows support common comparison operators in condition statements:
| Operator | Description | Example |
|---|---|---|
| not or ! | Logical NOT operator. | not (event.code == “E1003”) |
| and or && | Logical AND operator. | (event.code == “E1003”) and (event.severity > 50) |
| or or || | Logical OR operator. | (event.code == “E1003”) and (event.severity > 50) |
| not | Logical NOT operator. | not (event.code == “E1003”) |
String Operators
maiLink workflows support the common string operators in condition statements:
| Operator | Description | Example |
|---|---|---|
| contains | Tests if first operand contains the second operand in its entirety, with identical case. | event.code contains “E10” |
| endswith | Tests if end of the second operand is the exact ending of the second operand, with identical case. | metric.label endswith “_rpm” |
| in | Tests if the first operand equals an element in an array of strings, with identical case. | status.name in [“SWversion”,“SWoriginal”] |
| matches | Tests if the value of first operand is matches the regular expression given as the second operand | event.code matches “^.*_rpm_.*” |
| startswith | Tests if end of the second operand is the exact beginning of the first operand , with identical case. | metric.label startswith “airlock_” |
Condition Syntax Examples
These examples show some more complicated types of condition syntaxes.
| Type | Example Condition |
|---|---|
| Event | event.code == “E1003” |
| Event | event.code == “E0113” and device.tags[“contract”] in [“Warranty”,“Expired”] |
| Event | event.code == “E1003” or event.code == ”E1388” |
| Event | event.code in [“E1003”,”E1388”] |
| Event | event.code matches “^E1[0-9][0-9][0-9]$” |
| Metric | metric.label == “motor_rpm” and metric.value < 55 |
| Metric | metric.label == “motor_rpm” and metric.value < 55 and metric.value > 33 |
| Metric | metric.label == “motor_rpm” and metric.value < 55 and device.tags[“motor size”] == ”small” |
| Status | status.name == “version” and status.value == “1.3.2” |
| Status | Status.name == ”version” and status.value != device.tags[“RequiredVersion”] |
4 - Steps
Think of workflow steps as individual units of work. Together, performed in the right sequence, the workflow steps complete a body of work. This is no different that steps done manually, but without the possibility of human error such as leaving out a step, or performing a step incorrectly. When you create a new workflow you define the type, the model, the condition (when required) and give it a name. Then you define the individual steps that will be performed when the workflow is initiated. maiLink provide a drag-and-drop user interface for defining those steps, called the Step Builder.
Step Builder
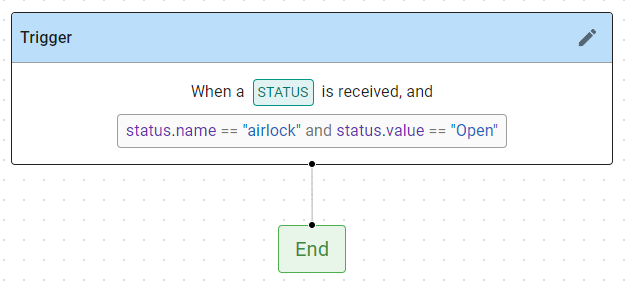
When you create a new workflow you are first presented with an empty Step Builder screen. It shows only the Trigger and End boxes in the workflow diagram, and the initial focus is on defining the Trigger.
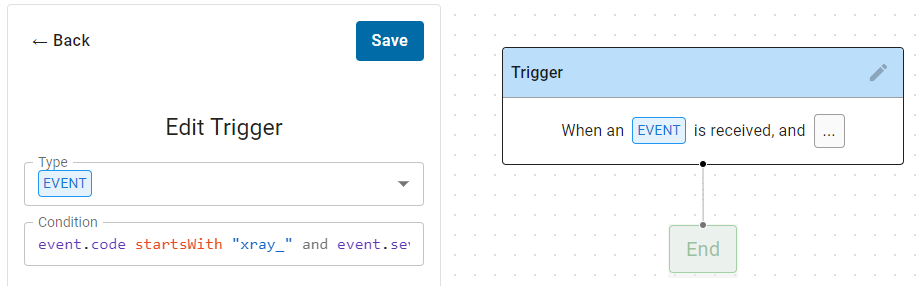
By default the trigger is set to an Event type, but you can select Manual (User_Dispatch), Metric or Status with the pull-down. For Event, Metric or Status type triggers, you then define the Condition. Default strings are inserted to give you some guidance and help you remember what to do.
- Type the condition
- As you type, syntactic suggestions are made.
- Select from the suggestions with the arrow keys.
- Add a suggestion to your condition with the tab key.
- Click Save to store your condition
- The Trigger box will be updated.
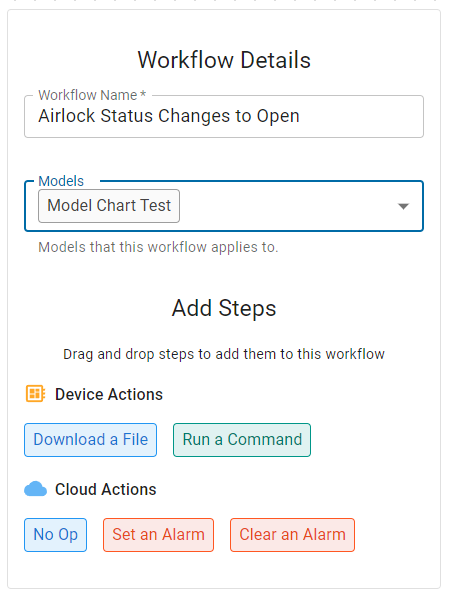
Then specify the workflow details at the left:
- Type in a name for the workflow.
- Select the Model that will use this workflow.
Note: Today you can select multiple models – this is a design issue that will be removed in a future release.
Note: Please select only a single model for each workflow. Why? Because there is only one copy of each workflow in the cloud. If you assign one workflow to multiple models, and in the future want to modify the workflow for just one of the models, you will have no way to easily do that.
Note: In a future version we will provide a way to create a copy of a workflow and reassign that copy to a different model. Then they can easily diverge.
Individual Steps
Within the workflow you can define the series of steps that will be executed to accomplish the goal. Order is important as the steps will be run in sequence, and no step will begin until the prior step and completed. Any step that fails will terminate the workflow.
| Step | Description | Parameters | Processing Location | Release |
|---|---|---|---|---|
| Run Command | Runs a single command line on the target device. | Command | Device | Mar 2023 |
| Set Device Tag | Sets the value of a Device Tag. | Device Tag Name | Cloud | ~Mar 2023 |
| Download File | Runs a single command line on the target device. | Command | Device | ~Apr 2023 |
| Set Alarm | Sets an alarm. | Alarm Name | Cloud | ~Apr 2023 |
| Clear Alarm | Clears an alarm. | Alarm Name | Cloud | ~Apr 2023 |
Defining the Workflow Steps.
To use the Step Builder:
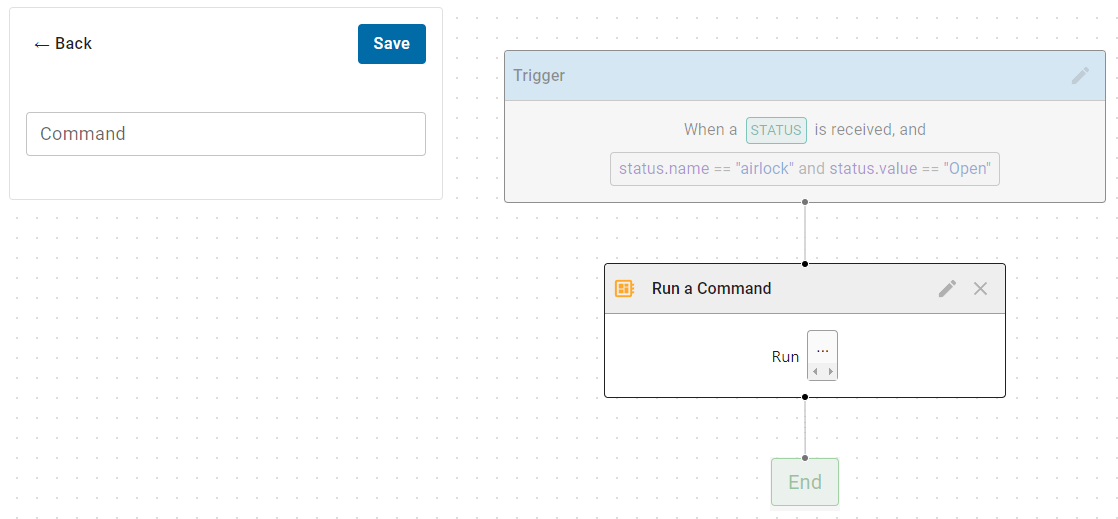
- Drag (left mouse click and hold) a color step block from the Add Steps are at the left.
- As you drag one, you will see circled green plus signs appear indicating where you need to drag the block.
- Release the mouse click when the tip of the cursor is over the desired circle.

- If the step requires inputs, they will open by default at the left.
- Enter the required data for the step.
- Click Save to store the parameters for that step.
- Continue dragging and dropping step blocks onto the workflow diagram until all the steps are in place.
- When all the steps are in place, click Save (bottom left) to save the workflow.